Ceiling Fan with Light Cleaning and Maintenance
To clean and maintain a ceiling fan with light, switch the fan and light off, wait for the blades to stop and the lighting area to cool, then remove dust from the blades, light cover and accessible housing with a soft dry cloth or a lightly damp cloth only when the surface finish permits it. Once cleaned parts are dry and correctly refitted, check normal operation; persistent wobble, unusual noise, flickering, burning smells, moisture or control problems are troubleshooting signals, not cleaning tasks.
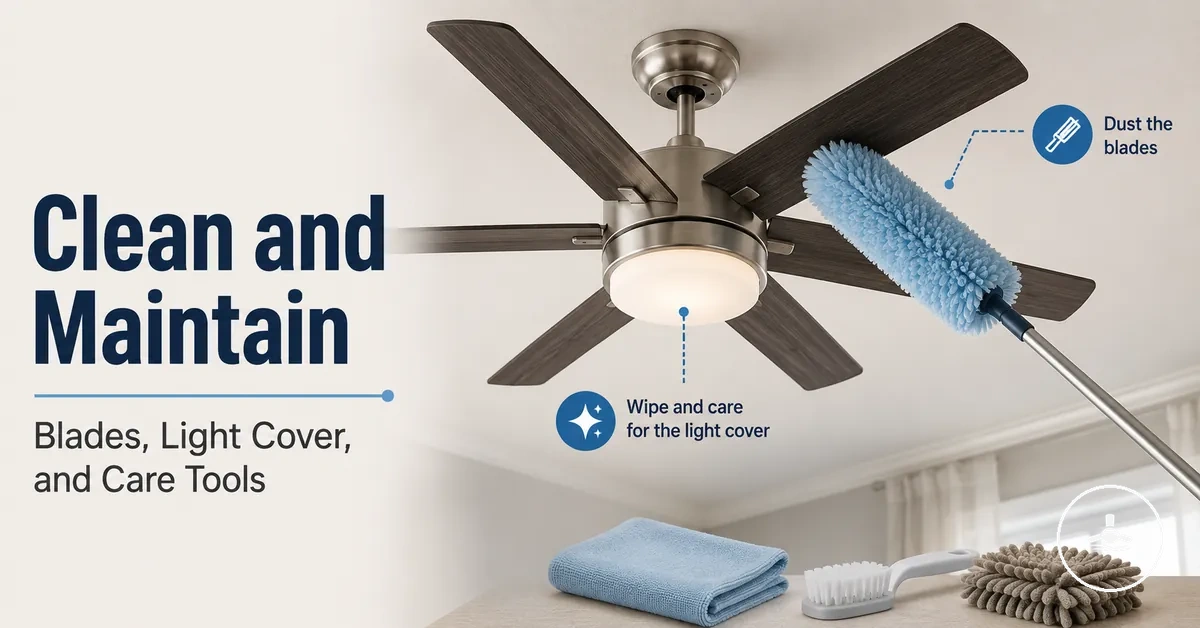
Ceiling fan cleaning and maintenance decision guide
Use the fan’s condition to choose the next action. Routine maintenance covers accessible surfaces and visible checks; persistent operating symptoms require a different troubleshooting path.
Before touching it
Switch the fan and light off, wait for the blades to stop, let the light cool, and use stable access. Isolate power as required before removing a lamp or light cover.
If the issue is dust, haze or fingerprints
Clean accessible surfaces gently. Use a dry microfibre cloth or duster first; use only minimal moisture when the material and finish allow it, and never spray liquid into the fan or light.
After cleaning
Make sure any removed cover is correctly seated and all damp-cleaned surfaces are dry, then restore power and observe light response, sound, controls and blade movement.
Stop cleaning and escalate
Persistent wobble, new unusual noise, flickering, a light that stays off, burning smell, moisture inside the unit, control failure or uncertain mounting should be handled as troubleshooting or service rather than repeated cleaning.
Maintenance boundary: clean and inspect accessible exterior parts only. Do not force covers, bend blades, open sealed electrical components or use cleaning as a substitute for fault diagnosis.
Routine care covers the blades, light cover or diffuser, accessible motor housing and canopy, visible fittings, and normal control response. Dust, haze and handling marks are cleaning conditions; looseness or changes in operation are signals to inspect cautiously rather than assume a cause. The ceiling fans with lights guide provides the broader room, lighting, control and fit context.
Cleaning can make wobble, loose parts, light behaviour or control-response changes easier to notice, but it does not diagnose electrical or mounting faults. Model design, mounting condition, lighting type and access determine which parts can be handled safely during routine maintenance.
Ceiling Fan Parts That Need Regular Cleaning and Care
Routine care focuses on the parts exposed to dust, airflow, heat or handling: blades, the light cover or diffuser, the lamp or integrated-light area, motor housing, canopy, visible fittings, controls and remote. The correct action depends on whether the issue is surface contamination, visible looseness or a change in operation.
Dust or haze is normally a cleaning condition. By contrast, persistent wobble, looseness, flickering or inconsistent control response is an operational signal that cleaning alone may not resolve.
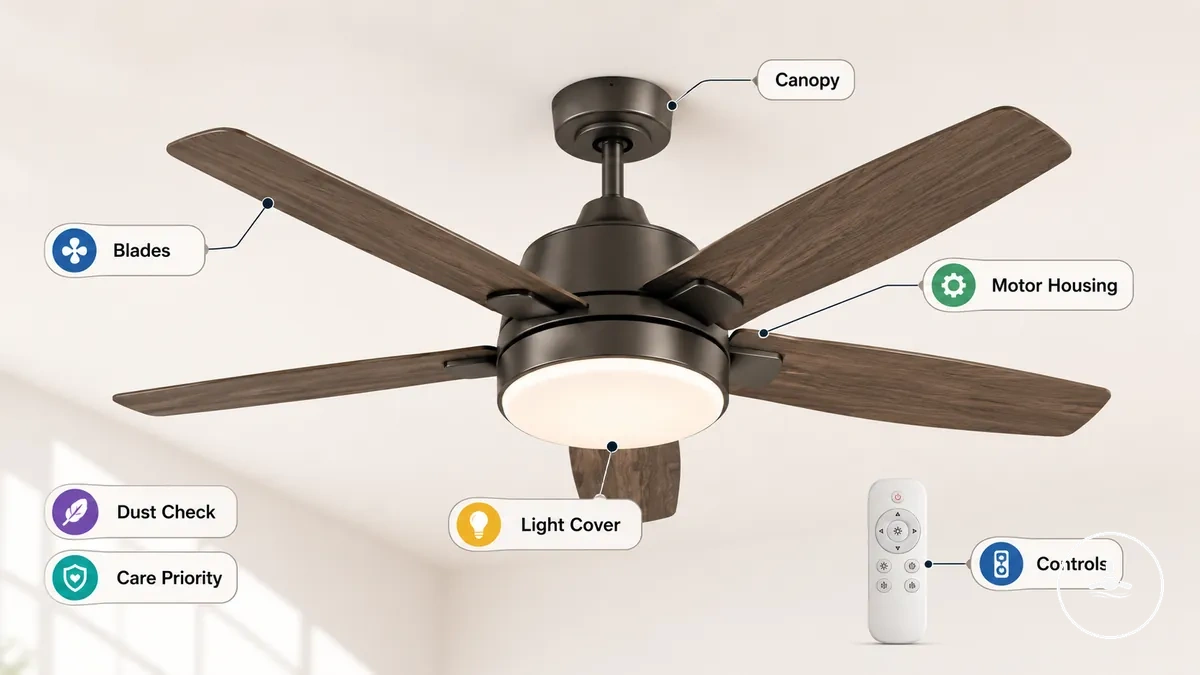
Use the visible condition of each component to choose the maintenance action, while keeping routine care limited to accessible exterior surfaces.
| Part or component | Typical visible condition | Routine action | Stop or escalate when |
|---|---|---|---|
| Blades | Surface dust or light sticky film | Dust gently; use a lightly damp cloth only if the finish permits it, then dry. | Wobble persists, a blade appears damaged, or hardware looks insecure. |
| Light cover or diffuser | Dust, haze, fingerprints or insects | Clean the accessible surface; remove it only if it is designed to detach without force. | The cover is cracked, will not release normally, or will not seat securely. |
| Lamp or integrated-light area | Dust around accessible lighting surfaces | Clean only when cool and keep moisture away from electrical parts. | A sealed module would need to be opened, or the light remains off or flickers. |
| Motor housing | Visible exterior dust | Wipe the exterior gently. | Access would require opening the housing, or there is moisture, damage or an unusual smell. |
| Canopy and visible mount area | Dust around accessible exterior surfaces | Wipe visible surfaces without disturbing the mount. | Movement, looseness, damage or uncertain mounting is visible. |
| Controls and remote | Surface dust or handling grime | Wipe external surfaces gently. | Normal response remains inconsistent after routine care. |
If the fan uses integrated lighting or an unfamiliar diffuser design, keep cleaning to accessible surfaces and use the LED lighting care considerations for lighting-specific maintenance boundaries.
Safe Preparation and Cleaning Tools
Safe preparation starts by switching the ceiling fan and light off, waiting until the blades have stopped completely, and allowing the lighting area to cool before it is handled. If a lamp or light cover will be removed, isolate electrical power in the way specified for the fan before starting that task.
Use stable access and tools that match the surface. The essential checks are simple: no moving blades, no hot lighting parts, no overreaching, and no liquid entering electrical areas.
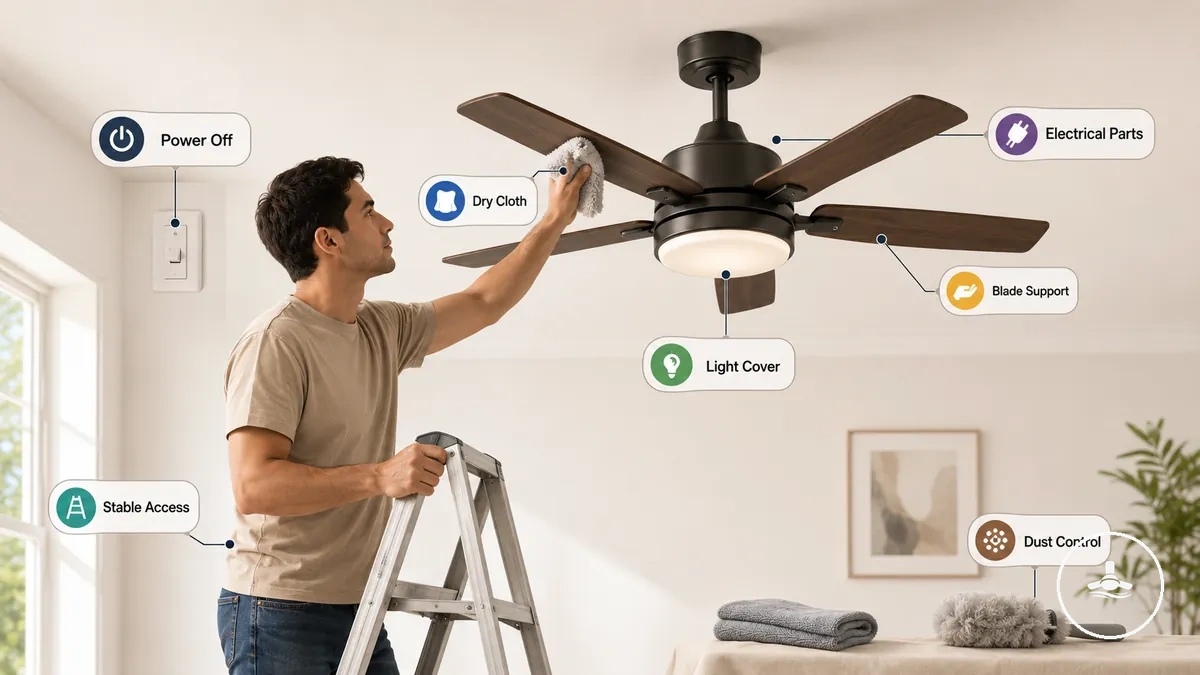
Pre-cleaning safety checklist
- Power and movement: confirm the fan and light are off and the blades are stationary before touching them.
- Temperature: wait until the lamp, diffuser and nearby lighting surfaces are comfortable to touch.
- Access: use a stable step ladder or other suitable access; do not lean or overreach to reach a blade or cover.
- Tools: start with a dry microfibre cloth or soft duster. If the finish permits damp cleaning, the cloth should be lightly damp rather than dripping.
- Moisture control: never spray cleaner directly onto the fan, motor housing, controls or lighting area.
- Blade support: support the blade gently while wiping so cleaning pressure does not twist the blade or blade arm.
- Cover handling: support glass or fragile covers and remove them only when they detach normally without force.
- Stop condition: stop routine cleaning if you find visible damage, persistent looseness, moisture inside the unit, a burning smell or an electrical symptom you cannot identify safely.
If the fan is on a high ceiling, the cover is fragile or the mounting condition is uncertain, do not make difficult access or dismantling part of routine cleaning. For structural or installation boundaries, see installation requirements.
Tool rule: use the least aggressive method that removes the contamination. Dry dusting is the default for exposed surfaces; minimal moisture is appropriate only when the material and finish allow it, and the surface should be dry before power is restored.
How to Clean Ceiling Fan Blades Without Spreading Dust
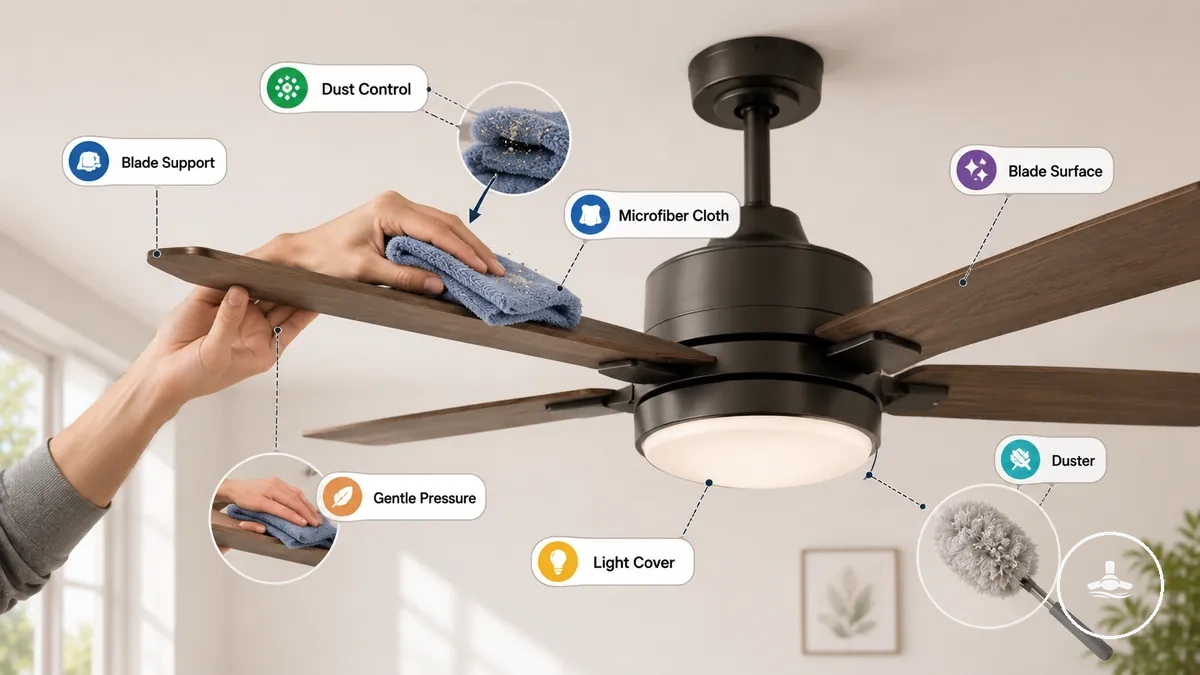
Clean each ceiling-fan blade with slow, supported strokes so dust is captured rather than pushed into the room. The method should become more cautious as the blade finish becomes more delicate or the buildup becomes stickier.
For loose dust, a dry microfibre cloth or soft duster is usually enough. For residue that does not lift dry, use a lightly damp, well-wrung cloth only when the blade finish permits it, then dry the surface promptly.
Blade-cleaning sequence
- Support one blade gently with one hand, avoiding upward or sideways force on the blade arm.
- Wipe from the blade root towards the tip using slow strokes that collect dust in the cloth or duster.
- For heavier dry buildup, fold or reposition the cloth as it loads with dust instead of brushing debris into the air.
- If sticky residue remains and the finish allows damp cleaning, use a lightly damp cloth, never a wet or dripping one, then dry the blade promptly.
- Repeat the same method on every blade so one blade is not left with a noticeably different dust load.
- Finish with a visual check for remaining dust, surface damage or hardware that appears loose; do not bend a blade to correct its position.
If dust falls onto the light cover, collect it before moving to the lighting area. Avoid soaking blades, spraying cleaner, using harsh chemicals or bending blade arms; these actions add moisture or mechanical force without improving routine dust removal.
How to Clean Light Covers and the Lighting Area
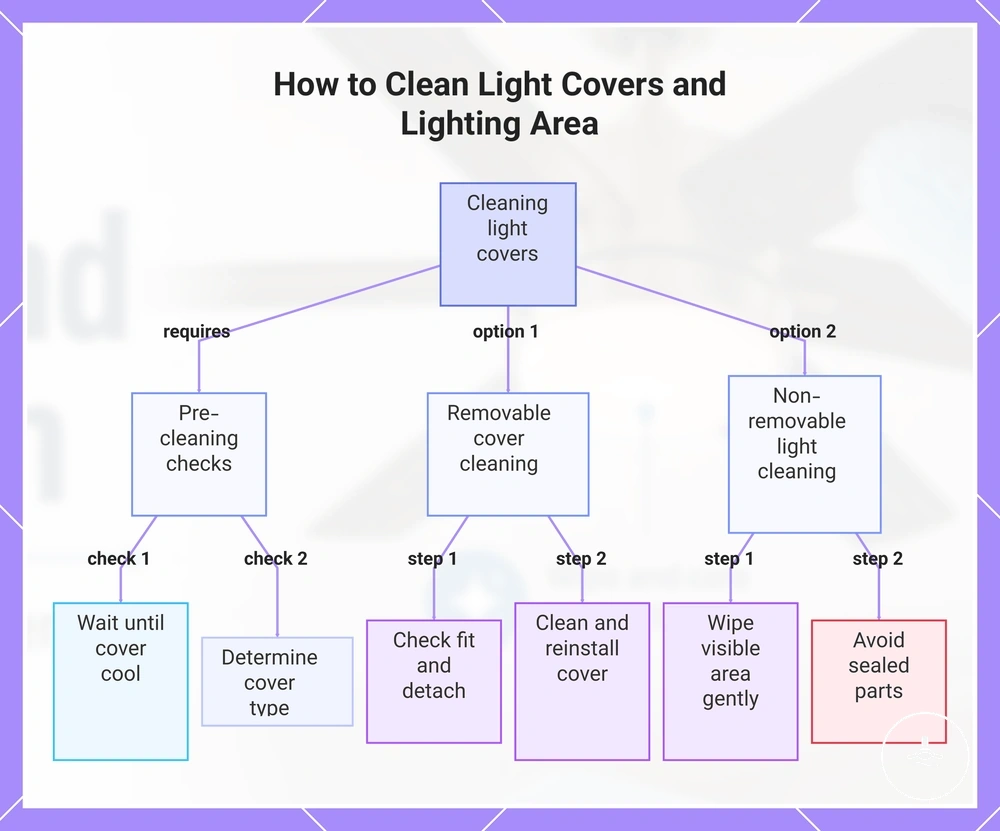
Clean the light cover and lighting area only after the fan and light are off and the lamp, diffuser and nearby surfaces have cooled enough to handle comfortably. The method then depends on whether the cover is designed to be removed or the lighting assembly is fixed or integrated.
A removable cover can be cleaned separately when it detaches normally and can be supported safely. A fixed diffuser or integrated-light assembly should be cleaned in place, with cleaning limited to accessible exterior surfaces.
Removable cover
- Confirm the cover is cool and identify how it is meant to release; do not begin removal if the fitting is unclear.
- Support the cover while detaching it without force, then place it on a stable surface.
- Remove dust, fingerprints or insects with a soft cloth. Use only the amount of moisture suitable for the cover material.
- Clean accessible surfaces on both sides, then dry the cover fully before refitting it.
- Refit the cover in its normal seated position without forcing clips, threads or retainers.
Fixed or integrated light
- Wipe the visible diffuser and surrounding lighting area gently without trying to open sealed parts.
- Use a soft dry cloth first; use minimal moisture only where the surface material permits it.
- Keep liquid away from seams, sockets, vents, electronics and the integrated LED module.
- If the diffuser fit, access method or sealed module is unclear, keep cleaning to the accessible exterior surface.
Fingerprints, insects, haze and dust can reduce the light cover’s clarity. Cleaning removes those visible deposits; it does not improve an LED module or lamp that has an electrical fault.
If the lighting area uses a sealed LED module or the cover fit is uncertain, do not dismantle it for cleaning. For additional lighting-specific boundaries, see LED lighting care considerations.
Cleaning the Motor Housing, Mount, and Fan Accessories
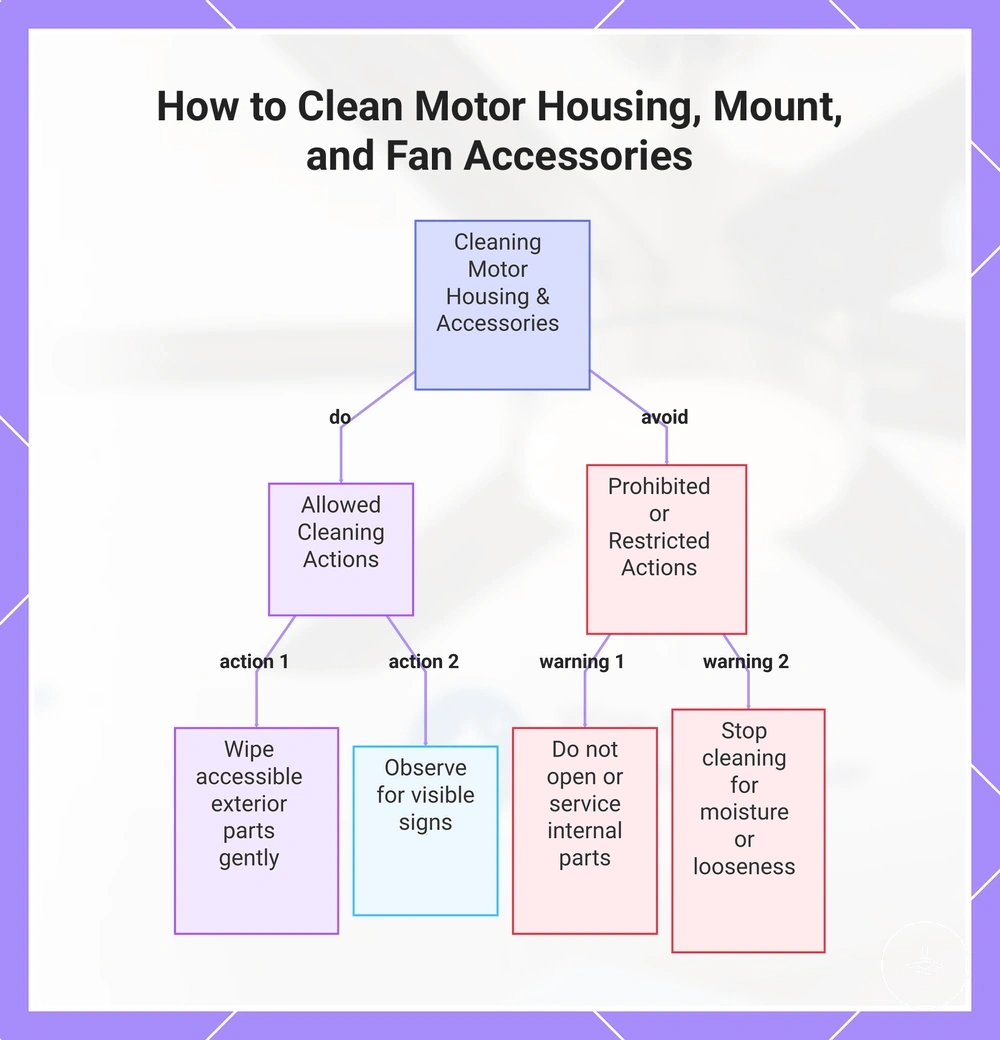
Routine cleaning of the motor housing, canopy, visible mount area and accessories is limited to accessible exterior surfaces. Gentle wiping removes surface dust without turning a cleaning task into internal servicing.
Use the component itself to set the boundary: wipe what is exposed, avoid disturbing wiring or enclosed parts, and treat movement, moisture or persistent looseness as a reason to stop cleaning.
| Component | Routine action | Avoid |
|---|---|---|
| Motor housing | Wipe surface dust with a soft dry cloth. | Opening the housing, inserting tools into vents or attempting internal servicing. |
| Canopy and visible mount area | Wipe accessible exterior dust without disturbing the mounting position. | Using cleaning to test structural security or continuing if movement or looseness is visible. |
| Pull chain and decorative trim | Remove surface grime gently while supporting nearby parts. | Pulling harder than normal or forcing a part that feels loose or damaged. |
| Remote or accessible receiver cover | Wipe the external surface only. | Opening enclosed electrical components or adjusting wiring. |
| Any area with moisture or damage | Stop cleaning and keep the condition visible for assessment. | Applying more liquid, concealing the condition or assuming cleaning proves the part is safe. |
Dust around the mount can be cleaned from accessible exterior surfaces, but visible movement, persistent looseness or moisture is not a cleaning condition. For structural boundaries, see installation requirements.
Routine Maintenance Checks After Cleaning
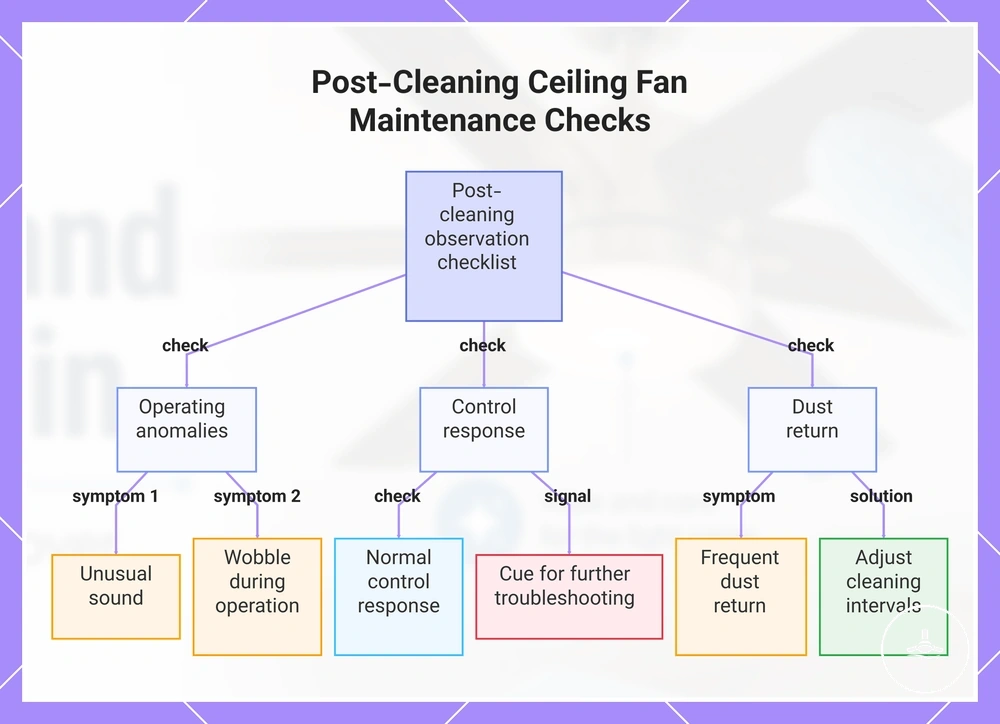
After cleaning, make a short visual and operational check. Restore power only after damp-cleaned surfaces are dry and any removable cover is correctly refitted, then observe the fan under normal controls without opening or adjusting internal parts.
The aim is to confirm that routine care is complete and to identify symptoms that need a separate next step. The same observation should not be used as proof of a specific fault.
| Check | Expected after routine care | If the condition is not normal |
|---|---|---|
| Blades | Surfaces are visibly clean and blade movement appears steady. | Inspect for uneven dust, visible damage or looseness; persistent wobble needs further assessment. |
| Covers and visible fittings | Parts that were removed are seated normally and do not appear loose. | Do not force a loose or misaligned part into place; stop if secure refitting is uncertain. |
| Light | The light switches on normally without continuing flicker. | Use the appropriate light troubleshooting path rather than repeating cleaning. |
| Controls | Remote, pull-chain or wall-control response is normal for the fan. | Persistent inconsistent response belongs to troubleshooting, not more surface cleaning. |
| Sound and movement | No new unusual sound or persistent wobble is present. | Stop and inspect further if the change persists or appears unsafe. |
| Dust return | Dust accumulates gradually according to room use and conditions. | Increase inspection frequency if visible buildup returns quickly. |
Decision rule: if a change remains after cleaning and a careful visible check, treat it as a troubleshooting or service issue rather than assuming another cleaning pass will fix it.
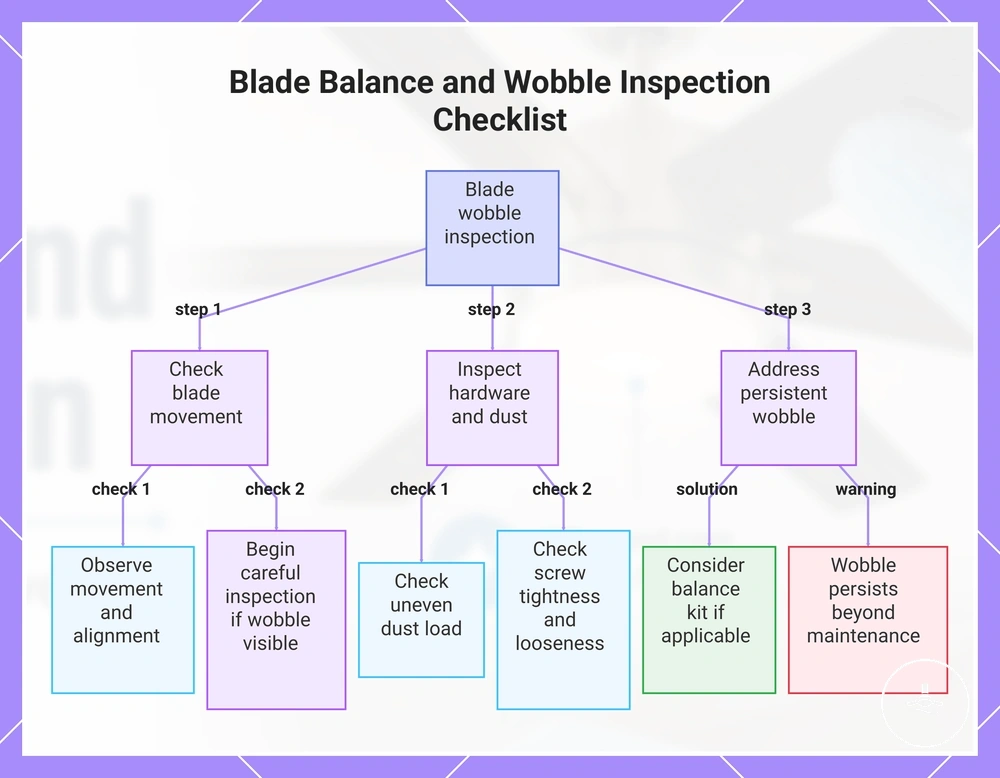
Blade Balance and Wobble Checks
Wobble noticed after cleaning should be checked for simple visible causes before any balancing attempt. Uneven dust can change blade loading, while damaged blades, insecure hardware or mounting problems require a different response.
Inspect with the fan off first. A balance kit is only a model-appropriate option after the blades are clean and obvious damage or looseness has been ruled out; it is not a substitute for repairing insecure or damaged parts.
| Observation | Check | Next action |
|---|---|---|
| Uneven dust load | Compare the visible buildup on all blades. | Clean each blade consistently, let any damp-cleaned surface dry, then observe again. |
| Visible loose hardware | Look at safely accessible blade screws and fittings with the fan off. | Do not force damaged or uncertain hardware; follow the fan’s instructions or obtain service if secure fit is uncertain. |
| Bent, warped or damaged blade | Compare blade shape and position without bending it by hand. | Do not bend the blade to correct wobble. Damaged parts need model-appropriate repair or replacement. |
| Blades clean, no visible damage, wobble remains | Confirm the symptom persists during normal operation. | A manufacturer-specified balance method may be appropriate; persistent or strong wobble should be assessed further. |
If wobble remains after these visible checks, the issue has moved beyond routine cleaning. For mounting and installation boundaries, see installation requirements.
Loose Screws, Bulbs, Covers, and Controls
Check only parts that are visible and safely accessible. A maintenance check should confirm whether a component appears seated and responds normally; it should not involve forcing fittings or opening electrical enclosures.
Use the component-specific checks below to separate a simple visible condition from a symptom that needs troubleshooting.
| Part | Routine visible check | Next action when abnormal |
|---|---|---|
| Accessible screws or fittings | Look for obvious looseness or damage with the fan off. | Do not force stripped, damaged or uncertain hardware; use model instructions or service if secure fit is unclear. |
| Removable lamp | When cool and power is isolated as required, confirm it is seated normally for its fitting. | Do not overtighten. If the light still does not work, move to light troubleshooting. |
| Light cover or diffuser | Confirm it is seated normally and does not appear cracked or loose. | Stop if it will not seat without force or the retention method is uncertain. |
| Pull chain | Check for normal movement and surface grime. | Do not pull harder than normal if movement remains abnormal after cleaning. |
| Remote or wall control | Test normal operation after cleaning is complete. | Persistent inconsistent response needs troubleshooting; do not assume surface dust identifies the cause. |
If the light still does not operate, see ceiling fan light not working. If it continues to flicker, use flickering ceiling fan light for troubleshooting beyond routine maintenance.
Cleaning Frequency and Dust Buildup Signals
Cleaning frequency should follow visible buildup and room conditions rather than a fixed universal timetable. Inspect sooner when dust, pet hair, humidity or frequent fan use makes buildup return more quickly.
The useful value is a condition-based trigger: clean when dust coats the blades, haze or fingerprints reduce light-cover clarity, or debris becomes noticeable around accessible fittings. If buildup returns quickly, shorten the inspection interval rather than assuming the same schedule suits every room.
| Condition | Buildup signal | Suggested response |
|---|---|---|
| Lightly used room | Little visible dust on blades or light cover | Inspect occasionally and clean when buildup becomes noticeable. |
| Frequent fan use | Visible dust collecting on blades | Increase inspection frequency and clean when dust affects appearance. |
| Visible light-cover haze | Dust or fingerprints reducing clarity | Inspect the light area and clean when haze becomes noticeable. |
| Higher humidity | Dust adhering more readily to surfaces | Check accessible surfaces more often and clean as needed. |
| Pet hair | Hair and dust collecting around blades or fittings | Inspect for visible buildup more frequently and clean when accumulation is noticeable. |
Frequency rule: keep the interval flexible. A clean fan in a low-dust room can be inspected less often; frequent visible buildup means the next inspection should happen sooner.
Common Cleaning Mistakes That Affect Fan Care
The most common cleaning mistakes add unnecessary moisture, chemical exposure, heat or mechanical force. Match the cleaning method to the component instead of using a stronger cleaner or harder pressure when a gentle method will do the job.
The table pairs each mistake with the part it affects, the practical risk and the safer maintenance choice.
| Mistake | Part affected | Why it matters | Safer alternative |
|---|---|---|---|
| Over-wetting | Electrical parts and nearby surfaces | Excess liquid can enter seams or reach parts that are not intended for wet cleaning. | Use a dry cloth first; use a lightly damp cloth only when the surface permits it. |
| Harsh chemicals | Blade finish and light cover | Strong cleaners may not be suitable for every finish or cover material. | Choose a gentle method suited to the surface. |
| Bending blades | Blades and blade arm | Excessive force may contribute to uneven movement or wobble. | Support the blade and clean with gentle pressure. |
| Forcing light covers | Light cover and cover fit | If the cover resists removal, forcing it may increase the risk of damage. | Stop and clean only accessible surfaces when the fit is uncertain. |
| Cleaning while the light is hot | Hot light and light cover | Hot lamps and covers increase burn risk and should not be handled during cleaning. | Wait until the lighting area has cooled before touching or cleaning it. |
| Ignoring wobble | Blades and visible hardware | Persistent wobble may indicate that further inspection is appropriate. | Carry out a gentle visual check before continuing normal use. |
| Dropping debris into the lighting area | Lighting area | Dust and debris may collect around accessible lighting components. | Capture debris while cleaning instead of brushing it into the light area. |
| Spraying cleaner directly | Motor housing, controls and lighting area | Spray can travel into seams, vents or electrical areas. | Apply any permitted moisture to the cloth, not directly to the fan. |
Gentler is usually better for routine care: capture dust, use only the moisture the surface can tolerate, support blades while wiping, and stop rather than force a cover or fitting.
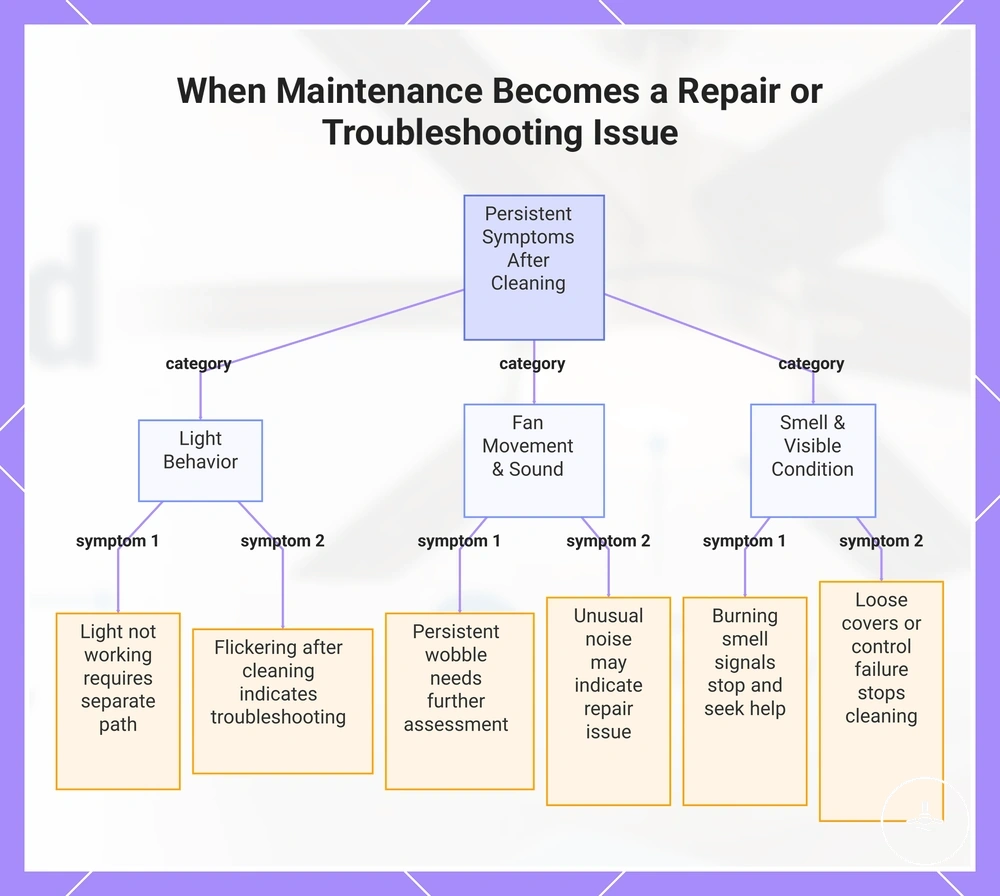
When Maintenance Becomes a Repair or Troubleshooting Issue
Routine maintenance ends when a symptom persists after accessible surfaces are clean and visible checks are complete. At that point, repeating the cleaning process is unlikely to address the problem; the symptom should move to troubleshooting, installation assessment or qualified service.
Use the symptom itself to choose the next path without assuming its cause. Light behaviour, movement, noise, smell, moisture and mounting condition each have different escalation boundaries.
| Symptom | Maintenance boundary | Next action |
|---|---|---|
| Light remains off | Cleaning no longer addresses the problem once visible maintenance checks are complete. | Use the ceiling fan light not working troubleshooting path. |
| Flickering continues | Persistent flicker is an operating symptom, not a surface-cleaning condition. | Use the flickering ceiling fan light troubleshooting path. |
| Burning smell, smoke or abnormal heat | Stop using the fan and light. Do not keep cleaning or testing the unit as normal maintenance. | Isolate power if it is safe to do so and obtain qualified electrical or service assessment. |
| Persistent or strong wobble | Wobble that remains after even cleaning and visible blade checks needs more than routine care. | Review balance and mounting conditions; obtain further assessment if it persists. |
| New unusual noise or scraping | Repeated noise after cleaning is an operational symptom whose cause should not be guessed from cleaning alone. | Stop normal use if the sound appears severe or unsafe and arrange further inspection. |
| Moisture inside the unit or visible mounting movement | These conditions are outside exterior cleaning. | Stop cleaning and obtain appropriate qualified assessment before normal use continues. |
| Persistent control failure | Surface wiping does not diagnose remote, receiver, switch or wiring faults. | Follow model-specific control troubleshooting or obtain service rather than opening electrical parts. |
Do not use cleaning as fault diagnosis. A persistent electrical, mounting, movement or control symptom needs the appropriate troubleshooting or service path, with the next step chosen from the symptom and the fan’s design.